A home’s attic serves as a crucial buffer between the living space and the outdoor environment. Without adequate insulation, this buffer is compromised, leading to significant thermal transfer. Attic insulation acts as a thermal barrier, slowing the movement of heat in and out of your home. During colder months, it prevents warm air generated by your heating system from escaping through the roof. Conversely, in warmer seasons, it blocks scorching attic heat from radiating down into your living areas. This direct impact on heating and cooling needs means that poor attic insulation can be a major source of energy waste, forcing your HVAC system to work harder and less efficiently.
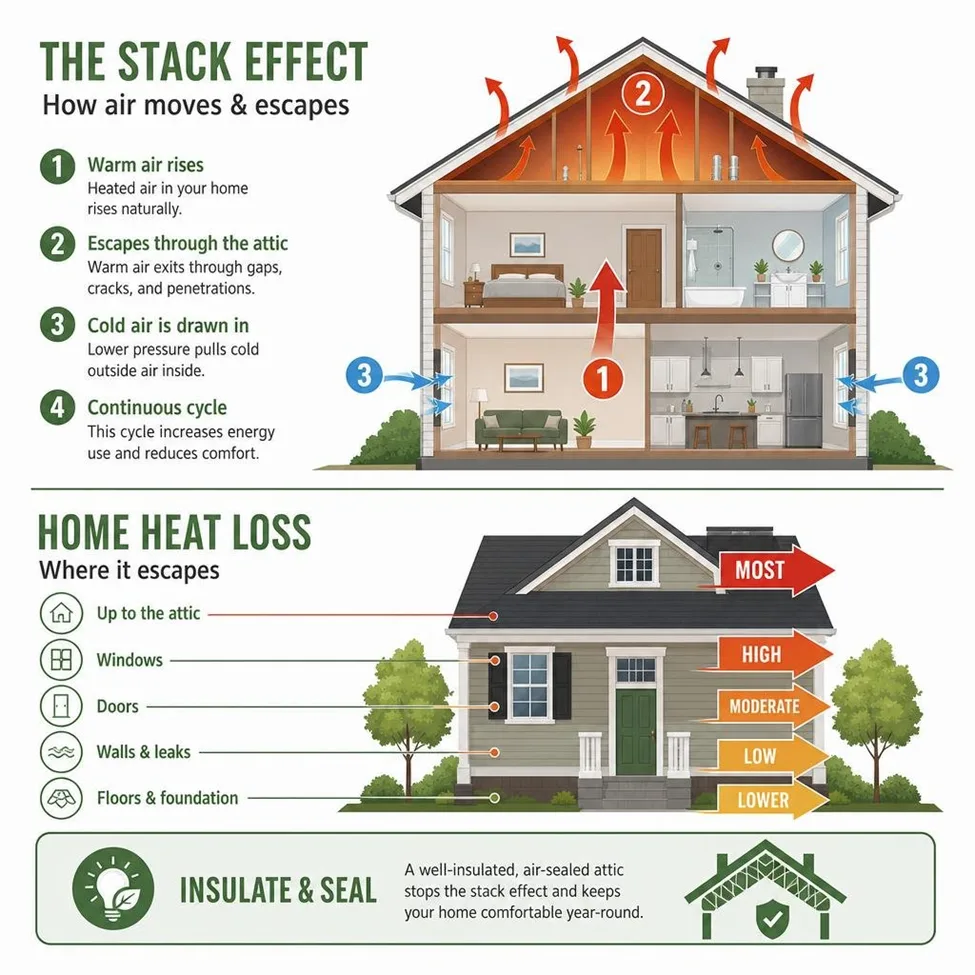
The “stack effect” is a prime example of how air movement in a home can lead to energy loss, particularly through the attic. Warm air naturally rises, and in a leaky, under-insulated home, it escapes through attic penetrations and gaps. This creates a vacuum, drawing colder outside air in through the lower parts of the house. This continuous cycle of air leakage and heat transfer puts immense strain on your HVAC system, leading to higher energy consumption and reduced comfort. Understanding these dynamics is key to optimizing your home’s thermal performance.
Maximizing Efficiency with Comprehensive HVAC and Comfort Systems
Proper attic insulation is foundational to maximizing the efficiency of your entire HVAC system. When your attic is well-insulated and sealed, your heating and cooling equipment doesn’t have to work as hard to maintain desired indoor temperatures. This reduces the workload on your furnace and air conditioner, which in turn extends their lifespans and reduces the frequency of costly repairs.
Beyond equipment longevity, insulation directly influences system sizing. An under-insulated home may require a larger, more expensive HVAC unit to compensate for heat loss or gain. By improving insulation, you might be able to install a smaller, better-sized system, leading to lower upfront costs and continued energy savings. The primary way insulation works is by resisting the flow of conductive heat, as measured by its R-value. The higher the R-value, the greater its thermal resistance, and the more effective it is at keeping your conditioned air where it belongs. This translates directly into lower utility bills and a more sustainable home environment. For homeowners looking to optimize their home’s thermal envelope, investing in Comfort Systems attic insulation is one of the most effective ways to achieve long-term energy savings.
Signs Your Home Needs Better Thermal Protection
Recognizing the signs of insufficient attic insulation is the first step toward improving your home’s energy efficiency and comfort. We often observe several indicators that suggest a home needs better thermal protection:
- Uneven Temperatures: If certain rooms are consistently colder or hotter than others, particularly those on the top floor, it’s a strong sign that heat is escaping or entering through the attic.
- High Energy Bills: A sudden or continuous increase in heating and cooling costs, without a corresponding change in usage habits or utility rates, often points to poor insulation allowing energy to leak.
- Ice Dams: In colder climates, ice dams forming on your roof eaves are a classic symptom of heat escaping from your attic, melting snow on the roof, which then refreezes at the colder edges.
- Visible Floor Joists: If you can easily see the floor joists in your attic, and the insulation is level with or below them, it’s a clear indication that you likely have less than the recommended amount of insulation. Most homes built before modern energy codes are under-insulated.
- Drafty Rooms: While drafts can come from windows and doors, air leaks in the attic can contribute to the stack effect, pulling cold air into your living spaces and creating a perpetually drafty feeling.
If you’re experiencing any of these issues, it’s a good time to assess your attic insulation.
Understanding R-Values and Climate Zone Requirements
The effectiveness of insulation is quantified by its R-value, a measure of its thermal resistance. A higher R-value indicates greater insulating power and a better ability to resist heat flow. The optimal R-value for your attic depends heavily on your geographic location and its corresponding climate zone. The U.S. Department of Energy (DOE) and the International Energy Conservation Code (IECC) provide comprehensive guidelines based on these climate zones, ensuring that homes are insulated appropriately for their regional weather patterns.
Insulation thickness is directly related to R-value; generally, more inches of insulation equate to a higher R-value, though this varies by material type. Understanding your specific climate zone is critical because building codes and energy efficiency recommendations are tailored to prevent excessive heat loss in cold climates and excessive heat gain in warm climates.
Recommended Insulation Levels by Region
The IECC divides the United States into various climate zones, each with specific R-value recommendations for attics. These guidelines help homeowners and builders achieve optimal energy efficiency for their region. For example, most of Virginia, where many of our clients reside, falls within Climate Zone 4 of the IECC. For this zone, a minimum attic insulation R-value of R-49 is typically recommended.
In colder climates (Zones 5-7), R-values can range from R-49 to R-60, requiring a substantial depth of insulation to combat freezing temperatures and reduce heating demands. In contrast, southern climates (Zones 1-3) might have slightly lower recommendations, often starting around R-30 to R-38, though higher R-values still offer significant benefits in reducing air conditioning costs. It’s always best to consult the latest IECC standards or local building codes for the most precise recommendations for your specific area.
How to Measure Your Current Attic Insulation
Determining if you need more insulation starts with a simple inspection of your attic. We recommend a “ruler test” combined with a visual inspection.
- Access Safely: Carefully enter your attic, ensuring you have adequate lighting and can safely navigate across joists.
- Visual Inspection: Observe the insulation. Is it evenly distributed? Are there bare spots? Can you easily see the tops of the floor joists? If the insulation is at or below the floor joists, it’s a strong indicator that you need more insulation.
- Measure Depth: Use a ruler or tape measure to determine the average depth of your existing insulation. Take measurements in several spots to get an accurate average.
- Identify Insulation Type: Identify the type of insulation you have (e.g., fiberglass batts, blown-in cellulose, blown-in fiberglass). Different materials have different R-values per inch. For common insulation types, a rough estimate is R-3 to R-3.5 per inch.
- Calculate Current R-value: Multiply the average depth (in inches) by the estimated R-value per inch for your insulation type. For example, if you have 6 inches of fiberglass batts (approx. R-3.2/inch), your current R-value is roughly R-19. Compare this to your climate zone’s recommended R-value to see if you have a deficit.
This assessment helps us understand your starting point and what R-value target you should aim for to achieve optimal comfort and energy savings.
Comparing Attic Insulation Materials for Optimal Comfort
When considering attic insulation, homeowners have several material options, each with distinct characteristics regarding R-value, cost, installation, and performance. The main types we encounter are fiberglass batts, blown-in cellulose, blown-in fiberglass, and spray foam. Mineral wool is another option, though less common in residential attics. The choice often comes down to balancing material density, R-value per inch, and the specific needs of your attic space.
Blown-In Loose-Fill vs. Traditional Batts
Blown-In Loose-Fill (Fiberglass or Cellulose): This method uses specialized equipment to blow insulation into the attic. It’s highly effective for filling irregular spaces, around obstructions, and over existing insulation, creating a seamless, gap-free coverage.
- Cellulose: Made primarily from recycled paper products treated for fire resistance, cellulose offers an R-value of approximately R-3.7 per inch. It’s dense, which helps resist air movement and provides good sound dampening. It can settle over time (10-20%), so installers often blow it in slightly thicker than the target depth.
- Fiberglass Loose-Fill: Composed of fine glass fibers, it has an R-value of about R-2.5 to R-3.5 per inch. It’s lighter than cellulose and settles less. Both blown-in types are excellent for retrofitting attics.
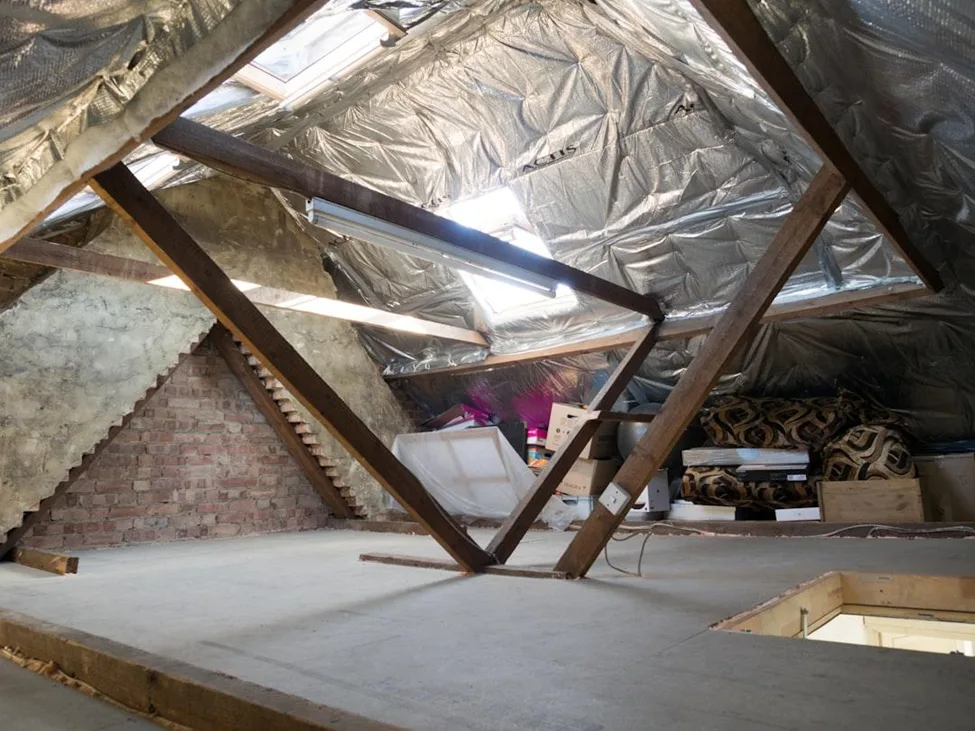
Traditional Batts (Fiberglass or Mineral Wool): These come in pre-cut rolls or sections designed to fit between standard joist spacing.
- Fiberglass Batts: Common and relatively inexpensive, with an R-value of about R-3.0 to R-3.8 per inch. They are often faced with a vapor barrier on one side.
- Mineral Wool Batts: Made from rock or slag, offering higher density and fire resistance, with R-values similar to fiberglass.
Comparison:
- Gap-Free Coverage: Blown-in insulation excels here, filling every nook and cranny and preventing thermal bridges. Batts, especially when cut around wires, pipes, or irregular framing, often leave gaps and voids that significantly reduce their effective R-value.
- Settling: Cellulose settles more than fiberglass batts or loose-fill fiberglass.
- Wind Washing: In ventilated attics, loose-fill insulation can be susceptible to “wind washing” near soffit vents if not adequately protected, reducing its R-value. However, dense-pack cellulose offers better resistance to this. Batts are generally less affected by wind washing if installed snugly.
- Installation Speed: Blown-in insulation can be installed quickly, especially in large, unobstructed attics, often taking a few hours. Properly installing batts to avoid gaps and compression can be more time-consuming and labor-intensive for DIYers.
For most attic retrofits, especially over existing insulation or in attics with many obstructions, blown-in loose-fill (cellulose or fiberglass) is often the preferred choice due to its superior ability to create a continuous thermal barrier.
The Role of Spray Foam in Unvented Attic Designs
Spray foam insulation, available in open-cell and closed-cell varieties, offers a unique solution for attic insulation, particularly in unvented or “conditioned” attic designs. Unlike traditional insulation applied to the attic floor, spray foam is typically applied directly to the underside of the roof deck.
- Conditioned Attic Space: When spray foam is applied to the roof deck, it effectively moves the thermal and air control layers from the attic floor to the roofline. This brings the entire attic space inside the home’s thermal envelope, making it a conditioned space. This is highly beneficial if you have HVAC ductwork or air-handling units in the attic, as it protects them from extreme temperature fluctuations, improving their efficiency and longevity.
- Air Barrier and Vapor Retarder: Spray foam acts as both an excellent insulator and an effective air barrier, preventing air leaks that contribute to energy loss. Closed-cell spray foam also serves as a vapor retarder, which can be crucial for moisture control in certain climates by preventing humid air from condensing on the cold roof sheathing.
- High R-value: Spray foam offers a very high R-value per inch (R-3.5 to R-7, depending on type), providing significant thermal resistance with less thickness than other materials.
While spray foam is generally more expensive than blown-in options, its ability to create a completely sealed, conditioned attic space makes it an attractive option for homeowners seeking maximum energy efficiency, especially when integrating HVAC systems in the attic. It also provides structural rigidity and can reduce outside noise.
The Critical Step of Air Sealing Before Insulating
Before any new insulation is added to an attic, the single most critical step is air sealing. Air leaks are often a greater source of energy waste than insufficient insulation. Even the highest R-value insulation will perform poorly if conditioned air can bypass it through cracks and gaps. We often say, “seal before you insulate” because insulation slows heat transfer through materials, but air sealing stops air movement through holes.
Air leaks in the attic contribute significantly to the “stack effect,” in which warm air rises through the top of the house, pulling in cold air from below. This constant air exchange can account for 30-50% of your home’s heating and cooling energy loss. Common air leakage pathways include gaps around utility penetrations (plumbing, electrical wires, vents), light fixtures, and the attic hatch itself. Using materials like expanding foam, caulk, and rigid foam board, we can effectively seal these bypasses and create a much tighter building envelope.
How to Locate and Seal Hidden Attic Air Leaks
Locating air leaks in an attic can sometimes feel like a treasure hunt, but it’s a vital step for optimal energy performance. We look for common culprits and less obvious areas:
- Plumbing Stacks and Electrical Wires: These penetrate the ceiling and often have gaps around them. Seal these with caulk or expanding foam.
- Chimney Chases: The area around a chimney can be a significant source of air leakage. Use fire-rated caulk or rigid fire-block insulation with a 2-inch clearance from the chimney.
- Recessed Light Fixtures: Non-IC (insulation contact) rated recessed lights generate heat and cannot be covered directly with insulation. They are also major air leaks. Seal around their housings with caulk or expanding foam, and consider installing airtight, insulation-contact-rated covers.
- Attic Hatch: The attic access point is often a huge source of air leakage. Weatherstrip the perimeter of the hatch and add a layer of rigid foam board insulation to the top of the hatch cover.
- Dropped Soffits and Wall Top Plates: These hidden areas can have significant gaps leading into wall cavities. Seal them with caulk or expanding foam.
- Knee Walls: If your attic has knee walls (short walls that create a finished room within the attic), ensure they are both insulated and air-sealed from the attic side.
A professional energy audit, often involving a blower door test, can precisely pinpoint air leakage sites, ensuring a comprehensive sealing strategy.
Protecting Ventilation and Fixtures
Proper attic ventilation is crucial for moisture control and preventing ice dams, so protect soffit vents when adding insulation.
- Soffit Vents and Rafter Baffles: Soffit vents allow outside air into the attic, which then flows up to ridge vents, creating a continuous airflow. When adding loose-fill insulation, it’s easy to block these vents. We install rafter baffles (also known as insulation baffles or vent chutes) between the rafters, extending from the soffit to above the insulation level. These plastic or foam channels ensure a clear pathway for air movement, preventing insulation from blocking the vents and maintaining proper attic ventilation.
- Recessed Light Covers: As mentioned, non-IC-rated recessed lights are fire hazards if covered by insulation. For these, we install specialized airtight, insulation-contact-rated covers, or “hats,” over the fixtures. These covers create a barrier, allowing insulation to be placed around and over them safely, while also sealing the air leaks they present. IC-rated lights are designed to be in direct contact with insulation.
- Bath Fan Ducting: Ensure that all bathroom exhaust fan ducts terminate outside the home, not just into the attic. Insulate these ducts to prevent condensation and seal any gaps where they penetrate the ceiling.
Taking these protective measures ensures that your insulation upgrade works in harmony with your home’s existing systems, maximizing benefits without creating new problems.
DIY Attic Insulation vs. Professional Installation
Deciding whether to tackle attic insulation as a DIY project or hire professionals depends on several factors, including your comfort level with heights, physical demands, the complexity of your attic, and your budget.
DIY Attic Insulation: For straightforward attics with easy access and minimal obstructions, adding blown-in loose-fill insulation can be a feasible DIY project. Many home improvement stores rent insulation blowers, often free with a minimum purchase of insulation bags.
- Material Costs: DIY can save significantly on labor costs. Materials like blown-in cellulose or fiberglass are relatively inexpensive.
- Specialized Equipment: While rental blowers are available, you’ll still need safety gear, a utility knife, a caulk gun, and possibly a headlamp.
- Payback Period: Due to lower upfront costs, DIY projects often have a faster payback period, sometimes as quickly as 1-3 years, especially when leveraging federal tax credits.
Professional Installation: Hiring a contractor is often recommended for attics with limited access, steep pitches, extensive air sealing needs, or if you prefer a hands-off approach. Professionals have the experience, specialized equipment, and knowledge to ensure proper installation, especially for spray foam.
Safety Precautions and Protective Gear
Attic work, whether DIY or professional, carries inherent risks. Safety should always be the top priority.
- Respiratory Protection: Always wear a high-quality dust mask or respirator (N95 or better) to protect against insulation fibers, dust, and potential mold spores.
- Eye Protection: Safety goggles are essential to protect your eyes from airborne particles.
- Skin Protection: Wear long sleeves, long pants, gloves, and a hat to prevent skin irritation from fiberglass or cellulose fibers.
- Temperature Awareness: Attics can reach extreme temperatures, especially in summer (over 120°F). Work during cooler parts of the day, stay hydrated, and take frequent breaks.
- Fall Prevention: Never step between joists unless you are certain there is a solid surface beneath. Always walk on joists or use plywood sheets to create a safe working platform. Be aware of where the ceiling below you is.
- Lighting: Use a bright headlamp or work light, as attic lighting is often poor.
- Electrical Hazards: Be cautious around electrical wiring. If you encounter old, frayed, or “knob-and-tube” wiring, do not disturb it and consult an electrician.
- Pest Control: Be prepared for potential encounters with rodents, insects, or their droppings.
When to Hire a Professional HVAC and Insulation Contractor
While DIY is possible, certain situations warrant calling in the experts:
- Knob-and-Tube Wiring: This older wiring system (pre-1950s) requires special care. Insulation cannot be packed tightly around it due to fire risk. A professional can assess and advise.
- Mold Remediation: If you find mold or mildew in your attic, it indicates a moisture problem that must be addressed and remediated by professionals before adding insulation.
- Asbestos Testing: If your home was built before the 1990s and has vermiculite insulation, it may contain asbestos. Never disturb vermiculite insulation without having it tested by a certified professional.
- Complex Rooflines or Limited Access: Attics with cathedral ceilings, many obstructions, or very tight access points are challenging for DIYers to insulate effectively.
- Spray Foam Installation: Spray foam requires specialized equipment, training, and safety protocols due to the chemicals involved. This is always a job for certified professionals.
- Existing Damage: If you notice water damage, pest infestations, or structural issues, these must be resolved by a professional before any insulation work begins.
For comprehensive assessments and installations that integrate with your HVAC system, we recommend consulting a qualified HVAC and insulation contractor. They can provide tailored solutions for your home’s unique needs.
Frequently Asked Questions about Comprehensive HVAC and Comfort Systems
We often receive questions from homeowners about optimizing their attic insulation for year-round comfort and energy efficiency. Here are some of the most common inquiries:
What R-value do I need for my attic insulation?
The ideal R-value depends on your climate zone. For most of the US, recommendations range from R-30 to R-60. For example, in IECC Climate Zone 4 (which includes much of Virginia), an R-value of R-49 is typically recommended. Colder zones may require R-60, while warmer zones might start at R-30 to R-38.
Can you lay new insulation over existing attic insulation?
Yes, in most cases, you can add new insulation over existing insulation, provided the existing material is dry, free of mold or pests, and in good condition. It’s crucial not to add a new vapor barrier if one already exists below, as this can trap moisture. Loose-fill insulation (cellulose or fiberglass) is often the best choice for adding over existing batts or loose-fill.
How does attic insulation affect my HVAC system performance?
Proper attic insulation significantly reduces the workload on your HVAC system by minimizing heat transfer between your home and the attic. This allows your furnace and air conditioner to run less frequently, maintain desired temperatures more easily, and operate more efficiently, leading to lower energy bills and extended equipment lifespan.
Should I air seal my attic before adding insulation?
Absolutely. Air sealing is arguably the most critical step before adding insulation. Insulation slows heat transfer through materials, but air sealing stops air movement through gaps and cracks. Air leaks can account for a substantial portion of energy loss, making even high R-value insulation less effective if not addressed first.
What is the difference between blown-in fiberglass and cellulose?
Both are loose-fill insulation types. Blown-in cellulose is made from recycled paper products, is denser, and offers a slightly higher R-value per inch (around R-3.7). It’s excellent for sound dampening and fills cavities well. Blown-in fiberglass is made from glass fibers, is lighter, and has an R-value of about R-2.5 to R-3.5 per inch. It settles less than cellulose and is more moisture-resistant.
How do I keep my soffit vents from getting blocked?
To prevent insulation from blocking soffit vents, install rafter baffles (also called insulation chutes or vent chutes). These rigid channels are placed between the rafters, extending from the soffit into the attic, ensuring a clear pathway for outside air to enter the attic and flow up to the ridge vents.
Is spray foam insulation worth the extra cost?
Spray foam insulation is generally more expensive than other options but offers unique benefits. It provides excellent insulation, acts as a superior air barrier, and, as closed-cell foam, serves as a vapor retarder. It’s particularly valuable for unvented attics, bringing the attic space into the conditioned envelope, which is ideal if you have HVAC ducts or equipment there. Its high R-value per inch also allows for thinner applications.
How long does typical attic insulation last?
The lifespan of attic insulation varies by type and conditions. Fiberglass batts and loose-fill can last 80-100+ years if kept dry and undisturbed. Cellulose loose-fill typically lasts 20-30+ years, though it may settle over time. Spray foam insulation can last 50+ years. Water damage, pest infestations, or compression can significantly shorten the lifespan of any insulation type.
What are the health and safety risks of DIY insulation?
DIY attic insulation involves several risks, including exposure to dust, fibers, and potential mold (requiring respiratory and eye protection), heat stroke in hot attics, falls through ceilings (requiring careful footing on joists), and electrical hazards from old wiring. Vermiculite insulation may contain asbestos and should not be disturbed without professional testing.
How much money can I save by insulating my attic?
Proper attic insulation and air sealing can significantly reduce your heating and cooling costs, with average savings ranging from 10% to 50% on energy bills. This can translate to hundreds of dollars annually, with a typical payback period for DIY projects often being 1-3 years, and 2-5 years for professional installations, especially when considering federal tax credits available for energy-efficient home improvements.
Conclusion
Optimizing your attic insulation is one of the most impactful steps you can take to enhance your home’s comfort, reduce energy consumption, and improve your HVAC system’s overall performance. By understanding the importance of R-values, selecting the right materials for your climate zone, and prioritizing thorough air sealing, you can transform your home into a more energy-efficient and comfortable sanctuary.
From the quiet efficiency of a well-insulated attic to the consistent temperatures throughout your living spaces, the benefits extend beyond just lower energy bills. You’ll experience improved indoor air quality, reduced strain on your heating and cooling equipment, and a more comfortable environment for your family year-round. Whether you choose a DIY approach for simpler projects or opt for the expertise of professional HVAC and insulation services for more complex needs, investing in your attic’s thermal envelope is a smart decision that pays dividends for years to come.